Rendering a Triangle with Apple's Metal API, using Go
 dmitshur
Did you learn that macOS 10.14 and newer has marked its OpenGL API support as deprecated?
Are you interested in giving Apple's Metal API a try?
Are you a fan of Go and don't feel like switching to Swift or Objective-C for this?
Then this post is for you.
By the end of this post, we'll render a single frame with a colorful triangle using Metal. We'll render to an off-screen texture, and then copy its contents into an image.Image for further inspection.
I'll focus more on the Go code to make this happen. If you're not already familiar with the general principles of modern low-level GPU APIs such as Metal, Vulkan, Direct3D 12, it's a good idea to learn more about them first. There are lots of resources on this topic, and they're easily findable. For Metal specifically, I can recommend watching the Metal for OpenGL Developers session from WWDC18 that gives a pretty good overview, especially for those who are familiar with OpenGL.
General approach
Metal API is officially available in Objective-C and Swift variants. We will use cgo, which allows calling C code from Go, to use the Objective-C Metal API. A wrapper Go package can be created, exposing Metal as a convenient Go API.
I've already started a Go package for this at dmitri.shuralyov.com/gpu/mtl, and I'll be using it below. It's in very early stages of development though, so its API is going to evolve over time. You're welcome to use it as is, as a starting point for your own version (i.e., fork it), or just for reference.
Hello Triangle high-level overview
At a high level, there are 10 steps we'll follow to render the triangle:
- Create a Metal device. (It needs to be available on the system.)
- Create a render pipeline state. (This includes vertex and fragment shaders.)
- Create a vertex buffer. (It will contain vertex data: the position and color of each triangle vertex.)
- Create an output texture. (To render into. We'll specify a storage mode, dimensions and pixel format.)
- Create a command buffer. (We'll encode all the commands for rendering a single frame into it.)
- Encode all render commands.
- Encode all blit commands. (This is to synchronize the texture from GPU memory into CPU-accessible memory.)
- Commit and wait. (Until all encoded commands have completed executing.)
- Read pixels from output texture. (Into an image.)
- Save the image. (As a PNG.)
Let's look at each of the steps in more detail.
1. Create a Metal device
This is the starting point.
It will work as long as your system has a Metal device on it, otherwise the error will report there isn't one. See the system requirements for Metal if you're not sure about your Mac.
device, err := mtl.CreateSystemDefaultDevice()
if err != nil {
	// Stop here and return the error to caller,
	// which can just do log.Fatalln(err) or so.
	return err
}
2. Create a render pipeline state
Metal uses the Metal Shading Language. Here's a starting program containing very basic vertex and fragment shaders:
#include <metal_stdlib>

using namespace metal;

struct Vertex {
	float4 Position [[position]];
	float4 Color;
};

vertex Vertex VertexMain(
	uint vertexID [[vertex_id]],
	const device Vertex * vertices [[buffer(0)]]
) {
	return vertices[vertexID];
}

fragment float4 FragmentMain(Vertex in [[stage_in]]) {
	return in.Color;
}
The vertex shader emits vertices from the vertex buffer. Note that each vertex contains a float4 position and color. float4 are four 32-bit float values.
We'll come back to this in the next step, since the vertex data we supply from the Go side needs to align with how the vertex shader will interpret it.
For simplicity, we'll put the Metal Shading Language program source code in a constant string literal in our Go code, and have Metal compile the shaders from that source. Then, we can use them to create a render pipeline state. It looks like this:
// Create a render pipeline state.
lib, err := device.MakeLibrary(`#include <metal_stdlib>
...
`, mtl.CompileOptions{})
if err != nil {
	return err
}
vm, err := lib.MakeFunction("VertexMain")
if err != nil {
	return err
}
fm, err := lib.MakeFunction("FragmentMain")
if err != nil {
	return err
}
rps, err := device.MakeRenderPipelineState(mtl.RenderPipelineDescriptor{
	VertexFunction:   vm,
	FragmentFunction: fm,
	ColorAttachments: [1]mtl.RenderPipelineColorAttachmentDescriptor{{PixelFormat: mtl.PixelFormatRGBA8UNorm}},
})
if err != nil {
	return err
}
3. Create a vertex buffer
This is where our geometry data is described. Each vertex contains a 4D position and an RGBA color. We'll use the mgl32.Vec4 type, which maps 1:1 to the aforementioned float4 type in the vertex shader.
// Create a vertex buffer.
type Vertex struct {
	Position mgl32.Vec4
	Color    mgl32.Vec4
}
vertexData := [...]Vertex{
	{mgl32.Vec4{+0.00, +0.75, 0, 1}, mgl32.Vec4{1, 0, 0, 1}},
	{mgl32.Vec4{-0.75, -0.75, 0, 1}, mgl32.Vec4{0, 1, 0, 1}},
	{mgl32.Vec4{+0.75, -0.75, 0, 1}, mgl32.Vec4{0, 0, 1, 1}},
}
vertexBuffer := device.MakeBuffer(unsafe.Pointer(&vertexData[0]), unsafe.Sizeof(vertexData), mtl.ResourceStorageModeManaged)
To create a buffer, we need to give it some raw bytes. At this time, we'll use C-style unsafe code to pass the pointer to the beginning of the memory block and its size. It might be worth considering avoiding unsafe and instead passing a safely converted []byte, but I'll leave that for future work.
4. Create an output texture
We'll specify an RGBA pixel format, with each component being a normalized uint8 ranging from 0 to 255. 512x512 will be the output size.
// Create an output texture to render into.
texture := device.MakeTexture(mtl.TextureDescriptor{
	PixelFormat: mtl.PixelFormatRGBA8UNorm,
	Width:       512,
	Height:      512,
	StorageMode: mtl.StorageModeManaged,
})
Importantly, we've used managed storage mode. That means there are two copies of the texture data: one in GPU memory, and another in CPU-accessible memory. As a result, when one makes changes to it, we'll need to synchronize the resource before the other can safely access the latest contents.
We'll deal with that in step 7 using a blit command encoder.
5. Create a command buffer
To render a frame, we need a command buffer to encode commands into. We can get a command queue from the device, and create a command buffer from it.
cq := device.MakeCommandQueue()
cb := cq.MakeCommandBuffer()
6. Encode all render commands
This step encodes all render commands into the command buffer.
// Encode all render commands.
rce := cb.MakeRenderCommandEncoder(mtl.RenderPassDescriptor{
	ColorAttachments: [1]mtl.RenderPassColorAttachmentDescriptor{{
		RenderPassAttachmentDescriptor: mtl.RenderPassAttachmentDescriptor{
			LoadAction:  mtl.LoadActionClear,
			StoreAction: mtl.StoreActionStore,
			Texture:     texture,
		},
		ClearColor: mtl.ClearColor{Red: 0.35, Green: 0.65, Blue: 0.85, Alpha: 1},
	}},
})
rce.SetRenderPipelineState(rps)
rce.SetVertexBuffer(vertexBuffer, 0, 0)
rce.DrawPrimitives(mtl.PrimitiveTypeTriangle, 0, 3)
rce.EndEncoding()
We've created a render command encoder that clears the color attachment on load, stores the results at the end, clears using black clear color, and uses texture as the render target.
We set the render pipeline state from step 2, the vertex buffer from step 3, and then issue a draw call with triangle primitive type, starting at index 0 and with 3 vertices in total.
EndEncoding indicates the end of encoding commands into the render command encoder.
7. Encode all blit commands
This step is necessary because the output texture we created in step 4 uses the managed storage mode:
Importantly, we've used managed storage mode. That means there are two copies of the texture data: one in GPU memory, and another in CPU-accessible memory. As a result, when one makes changes to it, we'll need to synchronize the resource before the other can safely access the latest contents.
We'll deal with that in step 7 using a blit command encoder.
The commands we've encoded in the previous step ensure a triangle is rendered to the texture by the GPU, so now's the time to tell it to synchronize that texture for CPU access.
// Encode all blit commands.
bce := cb.MakeBlitCommandEncoder()
bce.Synchronize(texture)
bce.EndEncoding()
The Synchronize blit command does exactly that.
8. Commit and wait
By now, we've encoded all the render and blit commands we wanted. We commit the command buffer, which gets the GPU to start executing them all, and wait for the all encoded commands to finish executing.
cb.Commit()
cb.WaitUntilCompleted()
If we didn't do the wait and moved on to the next step right away, we might get a partially-rendered triangle when reading the texture pixels.
9. Read pixels from output texture
We did wait, so we can now safely call texture.GetBytes to read the texture pixels. We'll copy them into an *image.NRGBA that we create with the same dimensions as the texture we created. Its pixel byte layout matches exactly, so we can just copy directly into img.Pix byte slice:
// Read pixels from output texture into an image.
img := image.NewNRGBA(image.Rect(0, 0, texture.Width, texture.Height))
bytesPerRow := 4 * texture.Width
region := mtl.RegionMake2D(0, 0, texture.Width, texture.Height)
texture.GetBytes(&img.Pix[0], uintptr(bytesPerRow), region, 0)
10. Save the image
We have the image.Image, let's write it to disk as a PNG with image/png package:
// Write output image to a PNG file.
err = writePNG("triangle.png", img)
return err
Where writePNG is a simple utility function:
// writePNG encodes the image m to a named file, in PNG format.
func writePNG(name string, m image.Image) error {
	f, err := os.Create(name)
	if err != nil {
		return err
	}
	defer f.Close()
	err = png.Encode(f, m)
	return err
}
Result
Putting all the steps together gives us the hellotriangle command. You can see it at dmitri.shuralyov.com/gpu/mtl/example/hellotriangle.
When we run it on a Metal-capable system, we get a beautiful triangle!
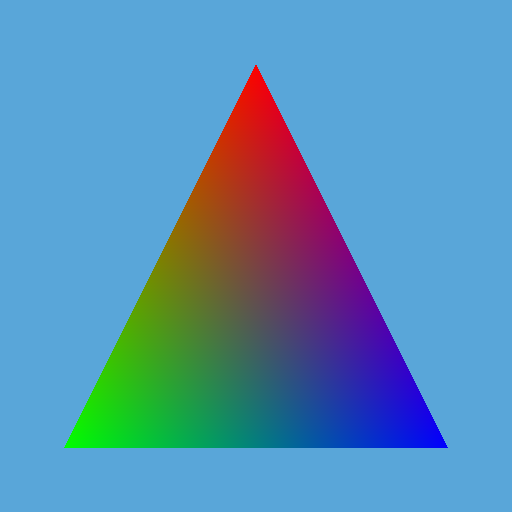
The triangle you render yourself will look even prettier to you, I promise. Good luck and have fun!
An update: there is now code to open a window with a Metal layer, and render a triangle that follows your mouse at 60+ FPS (vsync on).
See https://dmitri.shuralyov.com/gpu/mtl/example/movingtriangle.